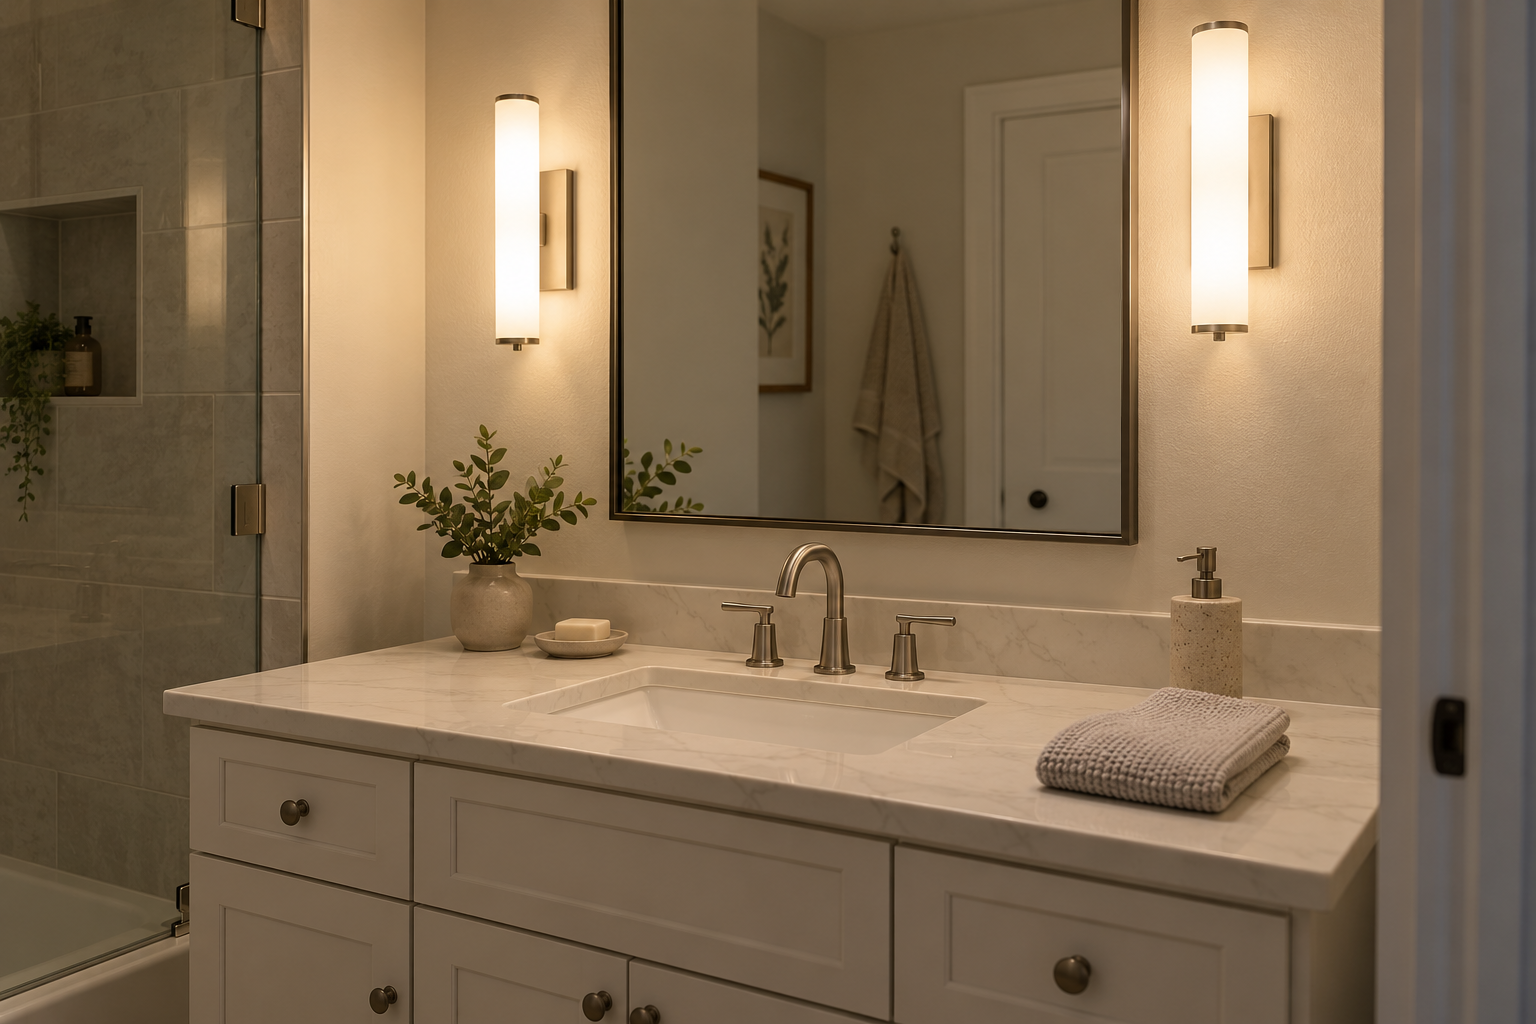
Before buying a whiter bathroom light, separate three problems: glare, shadows and color. Choose a shaded or diffused source if the lamp itself is uncomfortable to look toward. Reconsider light direction if your eyes sit in shadow. Compare color rendering and color temperature if familiar skin tones or makeup look wrong. A higher Kelvin number cannot solve all three.
Picture a guest bathroom with fresh hardware but an unhappy view in the mirror: the light looks yellow, the bulbs catch your eye and the area beneath your brows stays dark. I would start with what you want to change in that view, rather than choosing a new fitting by its finish alone.
1. Decide what the mirror needs to do
Name the main task: a quick handwash, shaving, detailed makeup or getting ready for work. Then name the constraint: one existing connection above the mirror, a wall-wide mirror with no side space, or a renovation that already includes electrical work.
Keep the decision specific. A guest powder room does not need to become a full makeup station, and a carefully chosen lamp cannot compensate for a fitting that leaves the working part of your face unlit. Start with a comfortable view from the position where you actually stand.
2. Identify glare, shadows or a color problem
| What feels wrong | What to check first | What to avoid buying on that evidence alone |
|---|---|---|
| Bright points make you squint | Whether you can see an exposed lamp or its reflection; the shade and diffuser design | A higher-output clear bulb |
| Brows, eyes or the area below your nose look dark | Where the light reaches your face from; whether ceiling light is doing all the work | A different color temperature with the same light direction |
| Familiar colors look flat or odd | The exact lamp’s color-rendering data, the chosen white-light appearance and nearby light sources | A product labeled only “daylight” |
| The whole view feels too warm or too cool | The labeled Kelvin value and how it looks beside the rest of your lighting | A whole new fixture before considering a compatible bulb change |
Compare the view with daylight absent as well as present, using the normal room lights. Keep the mirror position and task the same. If you try replacement bulbs, use only types and ratings permitted by the fixture, switch off the light and let lamps cool before handling them. Do not open the fitting or reach into its contacts.
Use the separate wrong-color-temperature guide when the main problem is an already-installed light that feels too yellow or blue. Keep flickering, heat or electrical noise out of the preference test: those need a compatibility or safety assessment.
3. Choose a bar or side sconces by the available wall
Put light where it reaches your face, rather than relying on the ceiling alone. Kichler’s bathroom guidance favors side sconces for grooming and warns that downlights alone can leave facial shadows. An above-mirror bar remains a practical option when the wall and existing connection limit the layout; its diffuser, position and distribution still matter.
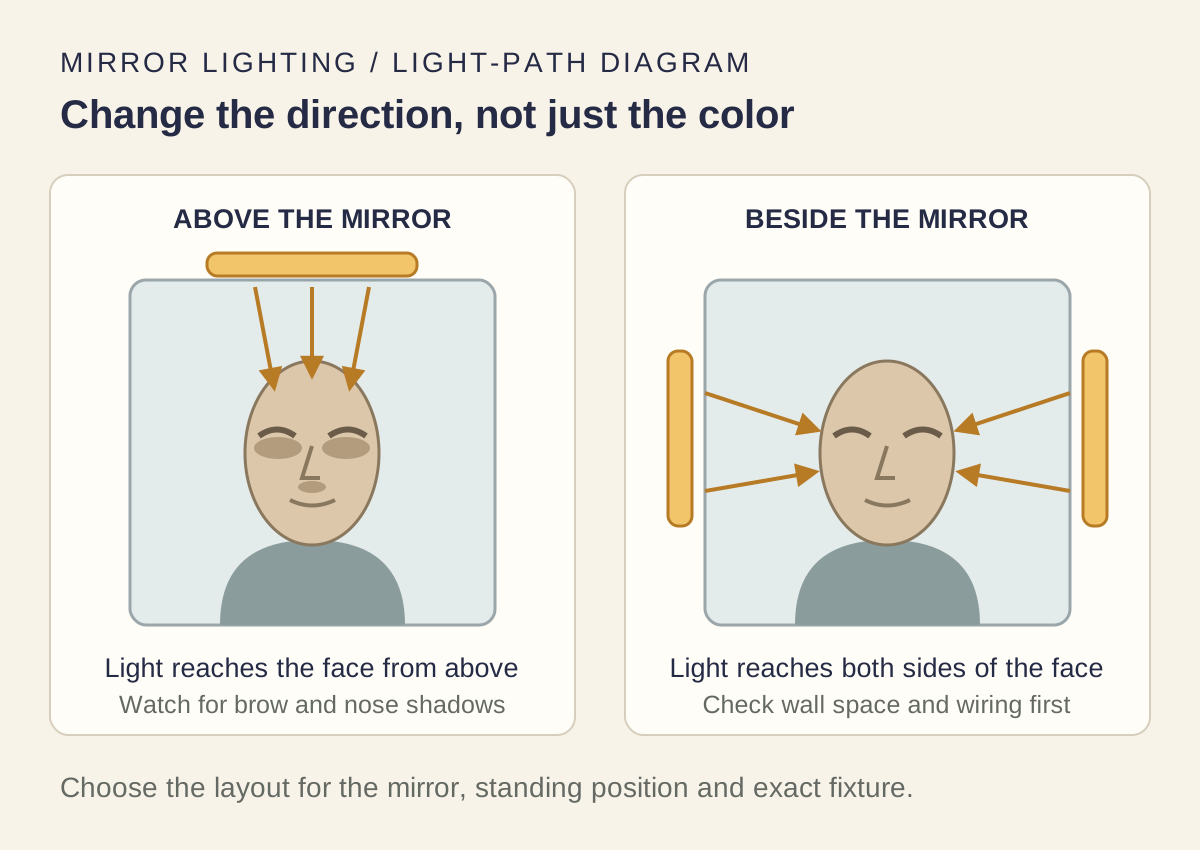
Answer three questions before ordering:
- Is there usable wall beside both edges of the mirror? Include the light’s full width and projection, cabinet-door travel and the manufacturer’s required clearances. A pair of sconces needs more than two empty strips of wall on a photo.
- How wide is the mirror, and where do people stand? Mark the proposed fixture outlines on the wall with removable paper. Check the view from each basin and user position. Do not assume a single central bar serves two standing positions equally well.
- Will the wiring move? Ask an electrician to assess new or relocated connections before committing to side lights. Treat the cost of wall repair as part of the choice.
If the existing above-mirror position must stay, compare a broad shaded bar or a permitted diffused-bulb arrangement from your normal eye position. Kichler notes that exposed downward-facing lamps can increase glare. Do not assume every frosted shade blocks every uncomfortable view, or that every overhead bar creates the same shadows.
The light paths in the diagram explain the placement choice; they do not predict the brightness or shadow depth in your bathroom. Use a supplier demonstration or a returnable, compatible lamp trial to resolve the part a drawing cannot settle.
4. Check color rendering before arguing about Kelvin
Look for the CRI specification for the exact lamp or fixture, including the selected color setting. Use CRI 90 or higher as a useful shortlist filter, rather than a promise that every face or cosmetic shade will look right. The Department of Energy describes that level as excellent color fidelity, but also explains that CRI is limited, particularly for saturated reds; R9 or TM-30 data can add information when available.
For makeup and other color-sensitive tasks, Your Home’s Australian government guidance advises CRI above 90. That is a reason to ask for better information, not a universal bathroom code requirement. Do not turn a missing R9 value into an invented score or assume “high CRI” in a product title identifies a tested model.
Read the CRI guide for the underlying concept. For this purchase, ask the supplier for the data sheet, the color setting to which it applies and a way to judge the actual light. Keep color rendering separate from the shade of white: a high-CRI warm lamp still looks warm. The CRI versus color-temperature comparison explains that distinction.
5. Compare 3000K, 4000K and 5000K without declaring a winner
Use the Kelvin number as a description of white-light appearance, not brightness, accuracy or quality. The DOE’s LED guidance separates color temperature from color rendering. “Daylight” on a box does not mean your bathroom will reproduce every daylight condition.
| Candidate | A reason to try it | The question to answer at your mirror |
|---|---|---|
| 3000K | You prefer a warmer appearance or want less contrast with nearby warm rooms | Does it feel pleasantly warm, or still too yellow for your task? |
| 4000K | You want a middle option between the other two candidates | Does it resolve the objection without introducing a different one? |
| 5000K | You prefer a cooler white and want to assess that appearance for grooming | Do you like it at night as well as beside daylight? |
Treat these as trial options. Keep lamp output, diffuser and placement as comparable as the products permit, so a much brighter exposed bulb does not decide what you think of a color temperature. Use 4000K versus 5000K for a closer comparison of those two choices.
Warm-white preferences and cooler-white preferences can both be sincere. Descriptions such as “hospital light” are reactions, not a technical category. A 6500K label identifies a higher color temperature than 5000K; it does not establish better makeup accuracy or a diagnosis of why someone dislikes the light. There is no need to settle that argument to choose a comfortable, useful mirror light.
If the warmer end is where you are deciding, the 2700K versus 3000K guide handles that narrower choice. For the cooler end, see 5000K versus 6000K. Compare the vanity with the bedroom or hallway you walk into, rather than judging every room in isolation.
6. Keep an escape route if the light disappoints
Choose a replaceable-bulb fitting when you value changing the light without changing the whole fixture. Confirm the permitted base, lamp size, wattage, enclosure suitability and dimming requirements. A bulb that fits the socket may still be unsuitable behind the shade or with the control.
Choose an integrated light when you prefer its form and have enough information about its light, controls and service options. Ask whether the LED module and driver are replaceable, by whom, and whether parts are supplied separately. Some are not serviceable: for example, Signify’s bathroom wall-light data sheet for model 919215851238 specifies an integrated, non-replaceable source. That is an example of why the exact documentation matters, not a recommendation or a claim about every integrated fixture.
Do not assume an adjustable color switch guarantees a good result at every setting. Check the available settings, output and color-rendering information. The DOE distinguishes dim-to-warm products, which change appearance as they dim, from systems with separately adjustable white light. Ask which behavior the proposed fixture actually offers.
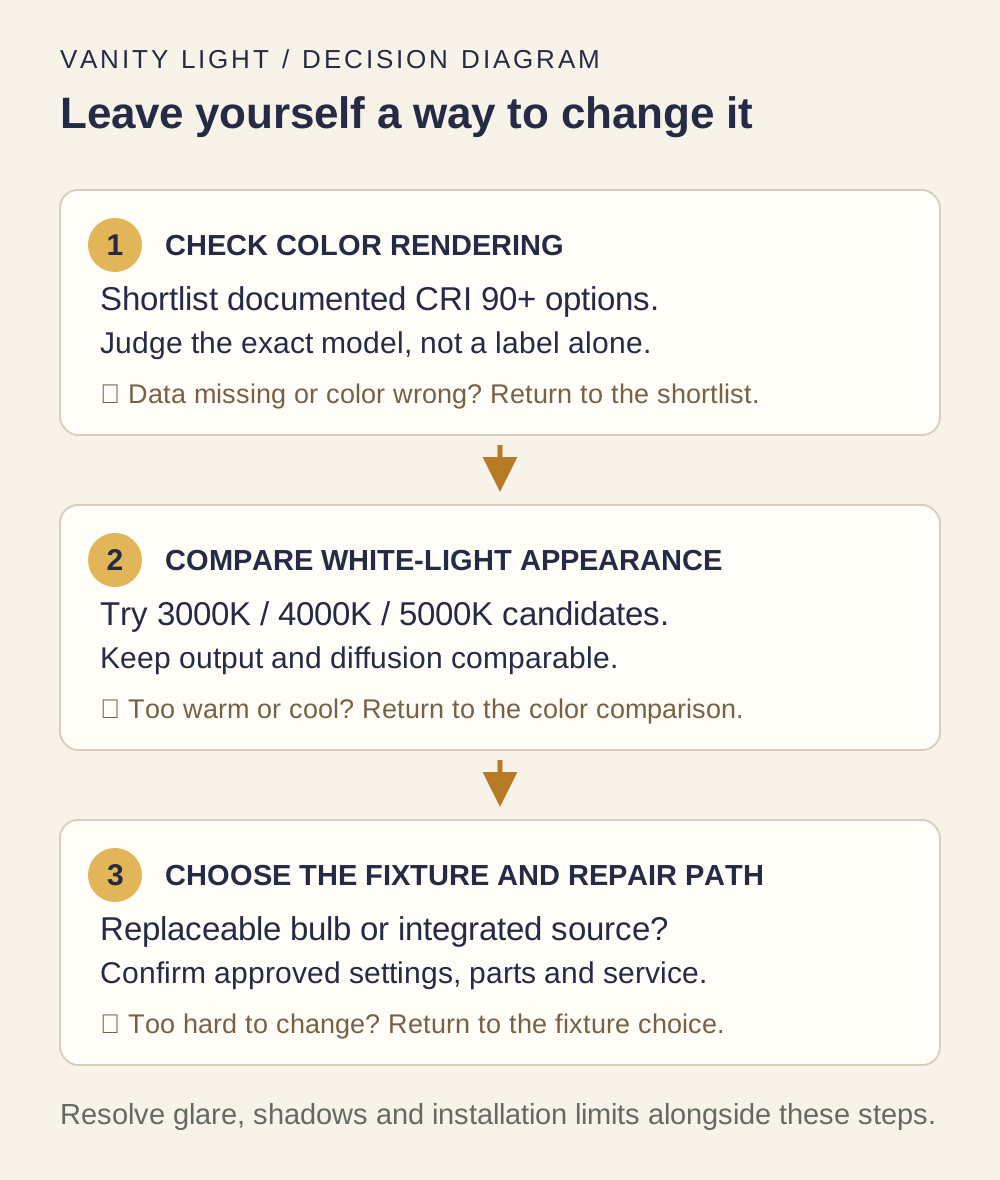
Read integrated LEDs versus replaceable bulbs before deciding how much repair flexibility to trade for the appearance of a particular bar. If you are still unsure about the color, favor a documented way to change it or a suitable return policy over a promise that you will get used to it.
7. Check the complete fitting before paying
Record the model numbers rather than buying from a photograph of a bathroom:
- Form and fit: full width, projection, mounting orientation, shade dimensions and access for changing lamps or servicing the unit.
- Light quality: the exact color temperature, CRI data and whether those specifications apply to the setting you plan to use.
- Output: published lumens for the complete fixture or permitted lamps. Do not assume the same total lumens produces the same light on your face through different shades.
- Control: whether both lamp and fixture support dimming, the specified dimmer type and any exact-model compatibility list. “Dimmable” alone does not confirm the combination.
- Moisture suitability: the product’s location marking and installation instructions for its actual position. UL’s marking guide distinguishes condensation-prone damp locations from wet locations where water can drip, splash or flow onto equipment. Ask the electrician which marking and local requirements apply; the word “bathroom” or an IP number alone does not settle the installation.
- Repair and returns: who can replace the source or driver, what parts are available and what happens if you dislike the light after a permitted trial.
Stop at the fan, wiring and retrofit boundary
Check whether one switch operates the vanity light and an exhaust fan together. Do not put a lighting-only dimmer in charge of the combined load. Leviton warns that a lighting dimmer can damage a ceiling-fan motor; that warning is not approval for an exhaust fan or a different combined arrangement. Have an electrician identify the loads and select a control expressly suitable for them.
Leave new connections, switch separation, concealed wiring and hardwired fixture changes to a qualified electrician. If considering a fluorescent-to-LED conversion, obtain the exact lamp and fixture instructions first. Do not remove a ballast, alter wiring or assume that an LED tube is a plug-in substitute. Ask the electrician to establish the approved configuration and its certification requirements.
Stop using equipment with burning smells, unusual heat, sparking, damaged insulation or repeated breaker trips, and arrange professional assessment. This guide does not provide live electrical tests or a wiring procedure.
8. Make one decision at a time
Before spending money, work through this list:
- Name the problem: glare, shadows, unwanted warmth/coolness or poor color appearance.
- Decide whether the existing above-mirror connection stays or side lights are feasible.
- Obtain the color-rendering information for the exact candidate.
- Compare a manageable set of color temperatures under similar conditions.
- Decide how you will change the light if it disappoints: a permitted bulb, an approved setting, a service part or a returned fixture.
- Confirm the complete dimmer, lamp and fixture combination, including any shared fan control.
- Have an electrician resolve wiring and location-suitability questions before installation.
Start with the smallest permitted change that addresses your actual complaint. If the bulb can be changed safely and the problem is color, a suitable bulb trial may answer more than a new fitting. If your face remains in shadow, put the next effort into light direction. Use the LED bulb buying guide when you are ready to turn that decision into a specification.
Questions & discussion
Share a question or a useful experience about this guide. Comments appear immediately. Your name and comment are public. Email is optional and stays private; reply emails are not enabled yet. Comment privacy.